Anyone can start a fire on a dry, calm day. Strike a match, touch it to some tinder, and you’re warming your hands in minutes. But the wilderness has a cruel sense of timing. The moment you truly need a fire — when you’re soaked to the bone, the temperature is dropping, and hypothermia is creeping in — is almost always the moment when everything around you is wet, the wind is howling, and conditions are at their absolute worst. This is the situation that separates those who simply own survival gear from those who actually know how to use it.
Starting a fire in the rain feels almost impossible to the unprepared. Wet wood won’t catch, matches fizzle, the wind steals every spark, and frustration mounts as the cold sets in. Many people give up, convinced it can’t be done. But here’s the empowering truth: experienced bushcrafters and survival experts start fires in pouring rain regularly, and the techniques they use aren’t magic — they’re learnable skills that anyone can master with the right knowledge and a little practice.
This guide hands you those exact techniques. We’ll walk through nine proven methods and principles for building a roaring fire even when the sky is dumping rain and everything around you is dripping wet. Master these, and you’ll possess one of the most valuable survival skills there is — the ability to summon warmth and fire when you need it most. Let’s beat the rain. 🔥
Before diving into the methods, it helps to understand exactly why rain makes fire-starting so difficult, because knowing the enemy is the first step to defeating it. Several factors conspire against you in wet conditions, and addressing each one is the key to success.
The core problem is that water prevents combustion. Wet wood and tinder must have their moisture driven off before they can reach ignition temperature, and damp materials simply refuse to catch a flame or sustain one. On top of that, rain actively extinguishes young flames and embers, while wind robs heat and snuffs fragile sparks before they can grow. Cold, wet hands also make the delicate work of fire-building clumsy and frustrating.
But here’s the encouraging part: every one of these obstacles has a solution. By finding or creating dry materials, protecting your fire from rain and wind, and using techniques designed for wet conditions, you can overcome each challenge in turn. The methods below address these problems systematically, turning an seemingly impossible task into a manageable one. Understanding why it’s hard is what makes the how finally click.
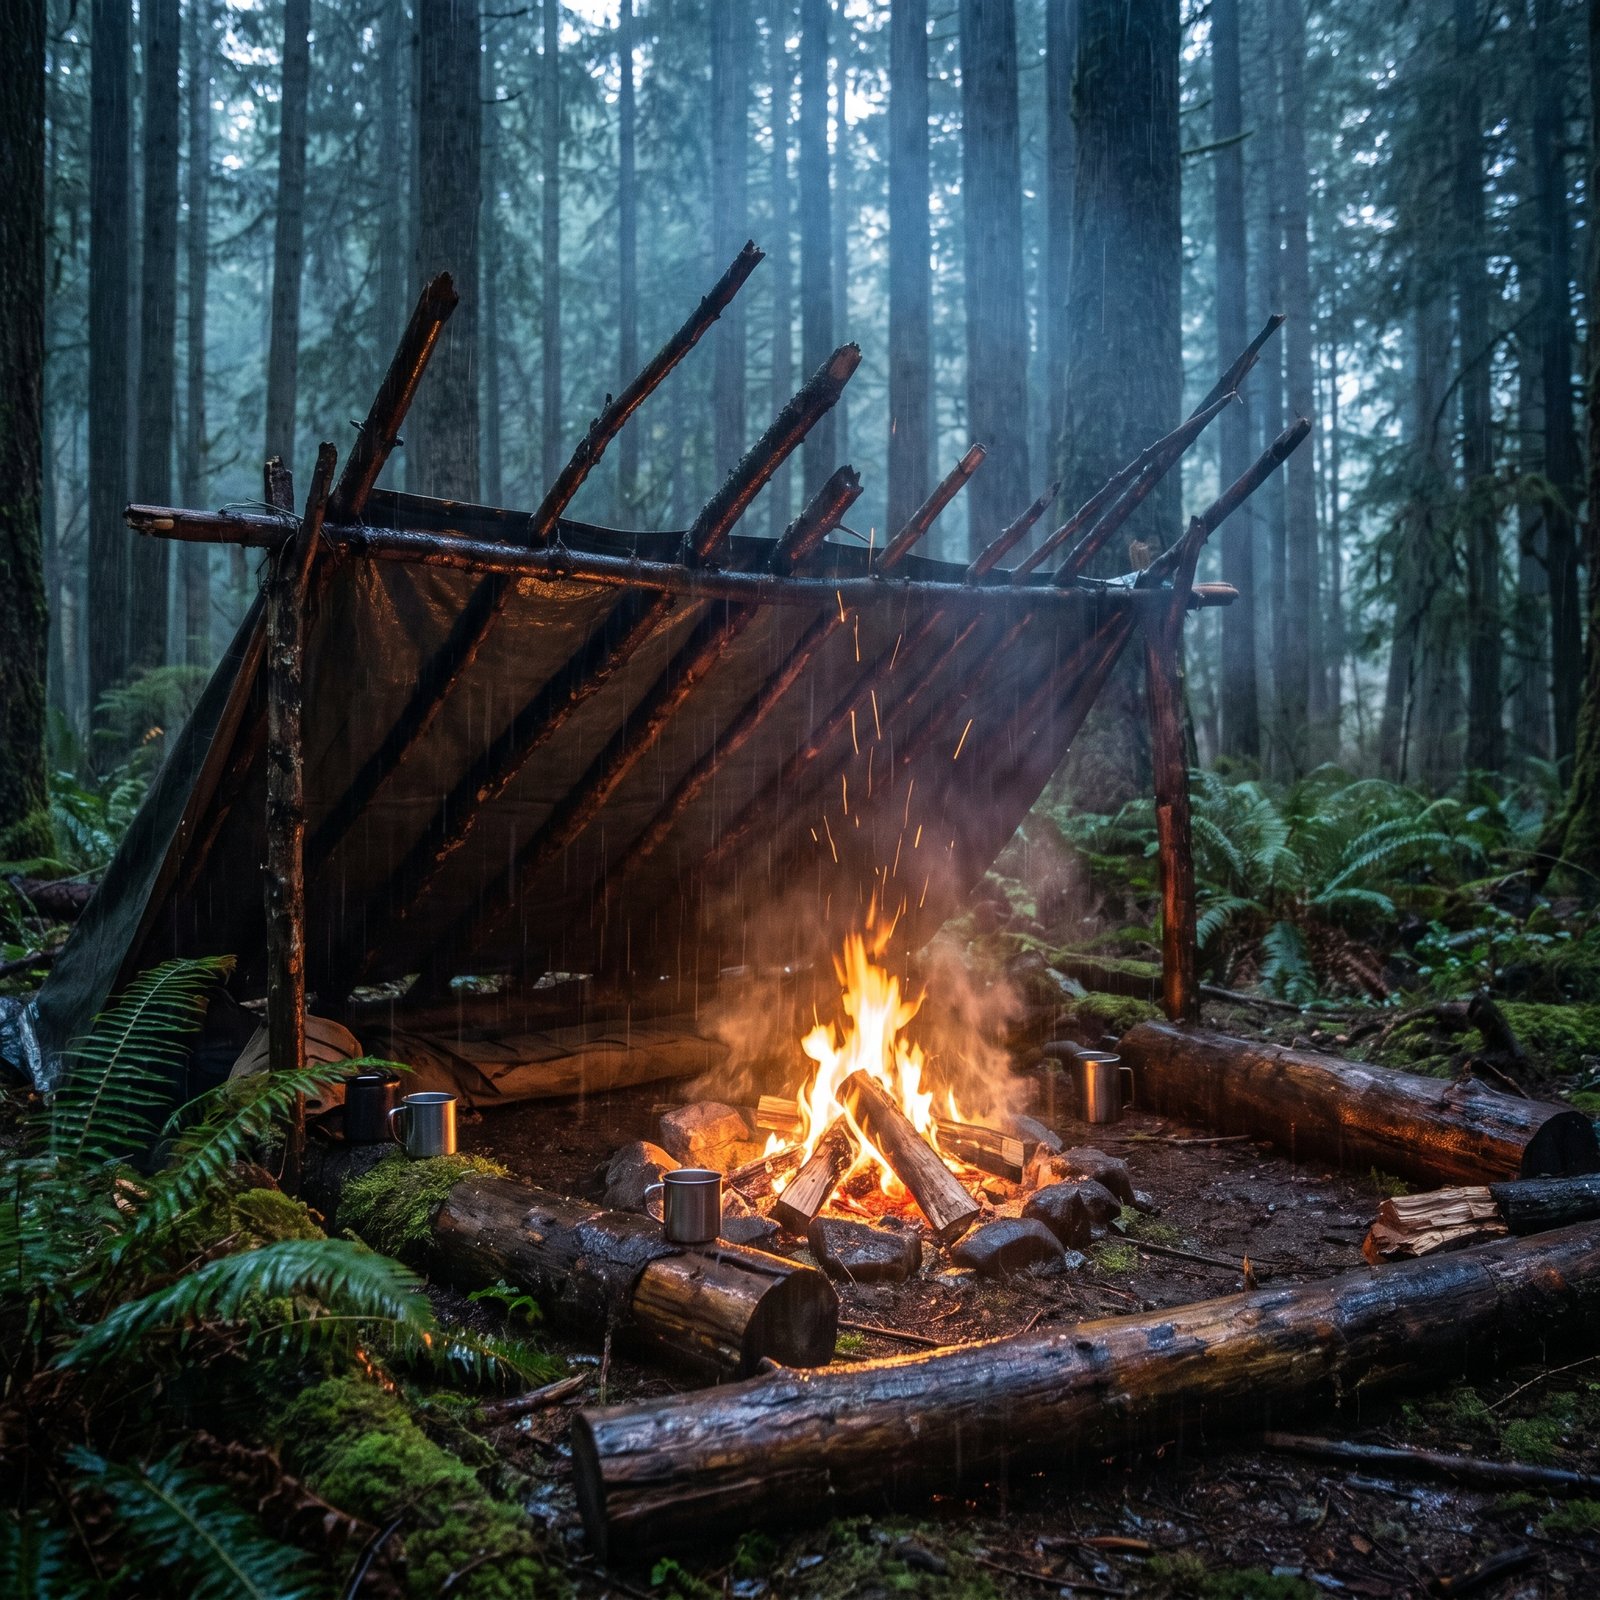
The very first step to a successful rain fire is choosing the right spot, because trying to build a fire in the full force of rain and wind is a losing battle from the start. Protecting your fire site from the elements dramatically improves your chances before you even strike a spark.
Look for natural shelter that blocks rain and wind — the underside of a dense evergreen canopy, an overhanging rock ledge, the lee side of a large fallen log, or a natural depression that’s not collecting water. These spots offer precious protection that keeps your tinder dry and shields young flames from being extinguished. Be sure any overhead cover is safe and won’t catch fire, keeping flames well clear of low branches.
If no natural shelter exists, create your own by rigging a tarp or emergency blanket as an angled cover above your fire site, positioned high enough to be safe from the flames while blocking the rain. Even a simple lean-to of branches can make a meaningful difference. Securing a protected location first lays the foundation that every subsequent step builds upon, so never skip it in your rush to get warm.
Wet ground is a silent fire-killer, wicking moisture into your fire and chilling it from below, which is why building a dry platform is a crucial step that beginners often overlook. Elevating your fire off saturated earth or snow keeps it from being smothered by ground moisture before it can establish.
Create a platform by laying down a base of dry or less-wet wood — splitting larger pieces to expose their dry interiors works well — arranged side by side to form a raised surface. This barrier insulates your young fire from the cold, wet ground, allowing the flames to build heat and dry out the fuel above rather than fighting moisture seeping up from below. Bark, flat stones (kept away from water to avoid steam fractures), or a layer of thicker branches can all serve as platform material.
This simple step makes a surprising difference, giving your fragile early flames a fighting chance to grow strong. A fire built directly on wet ground often struggles and dies, while the same fire on a dry platform takes hold and thrives. It’s a foundational technique that pairs perfectly with a protected location to set your fire up for success.
Tinder is the heart of any fire, and in the rain, finding genuinely dry tinder is often the single greatest challenge — and the most important skill to master. Even when everything looks soaked, nature hides dry tinder if you know where to look.
Seek out tinder in protected places the rain hasn’t reached: dry grasses and leaves under dense cover, the underside of logs, inside hollow standing trees, or beneath overhangs. Standing dead wood is often far drier inside than wood lying on the wet ground, and the small dead branches at the base of evergreen trees, sheltered by the canopy above, are a classic find. Birch bark is a survival favorite because its natural oils let it burn even when damp.
When natural tinder is scarce or wet, this is where carrying your own waterproof tinder — waxed cubes, petroleum-soaked cotton balls, or commercial fire-starters — proves invaluable, catching a spark instantly regardless of conditions. The lesson is clear: always pack reliable tinder for wet-weather insurance, and learn to spot nature’s hidden dry sources. With good tinder secured, you’re well on your way to fire even in a downpour.
Here’s a game-changing insight that transforms wet-weather fire-building: even after days of rain, the inside of wood is often bone-dry, and accessing that dry interior is one of the most powerful techniques in your arsenal. The rain only soaks the outer surface, leaving the heartwood within ready to burn.
Using a knife and the batoning technique — striking the spine of a sturdy fixed-blade knife with a piece of wood to split logs lengthwise — you can break open wet wood to expose the dry inner material. Splitting your kindling and fuel this way gives you dry surfaces that catch and burn far more readily than the wet exterior. You can also shave the dry inner wood into thin curls and feathersticks that ignite easily.
This is precisely why a quality fixed-blade knife is such an essential survival tool, and why the skill of batoning is so prized among bushcrafters. While the world around you drips with rain, the dry heart of a split log becomes your reliable fuel. Mastering this technique means a wet forest is no longer an obstacle but a fully stocked woodshed waiting to be opened.
Once you’ve split wood to reach the dry interior, transforming that dry wood into feathersticks is a brilliant technique for bridging the gap between tinder and kindling in wet conditions. A featherstick is a piece of dry wood shaved into a cluster of thin, curled shavings that catch flame easily while remaining attached to the stick.
Using your knife, carve long, thin curls into a stick of dry wood — the split heartwood from the previous step is perfect — creating a feathery mass of shavings that present lots of surface area to your flame. These fine curls ignite far more readily than a solid piece of wood, and because they’re attached to the stick, the growing flame quickly spreads to the thicker wood beneath. Several feathersticks together create a reliable foundation for your fire.
This technique is a bushcraft classic precisely because it solves the wet-weather problem so elegantly, turning a single piece of dry wood into easily-ignitable fuel without needing extra tinder. The skill takes a little practice to perfect, but it’s enormously satisfying and effective. Feathersticks are often the secret bridge that gets a rain fire from a tiny flame to a self-sustaining blaze.
All the dry tinder and split wood in the world means nothing without a way to ignite it, and in wet conditions, your choice of ignition source matters enormously. This is where having weatherproof fire-starting tools pays off dramatically.
A ferro rod is the gold standard for wet-weather ignition because it works perfectly even soaking wet, throwing hot sparks that ignite proper tinder regardless of rain — making it the survivalist’s first choice when conditions are miserable. Stormproof matches that burn through wind and water and windproof torch or plasma arc lighters are also excellent, far outperforming ordinary matches and cheap disposables that fail the moment they get wet.
The key lesson is redundancy: carry multiple weatherproof ignition sources so that if one fails, you have backups, and never rely on a single cheap lighter in the backcountry. Pairing a reliable ignition source like a ferro rod with quality waterproof tinder creates a combination that can spark a fire in nearly any conditions. With dry materials prepared and a dependable spark in hand, you’re ready to bring it all together into flame.
How you arrange your tinder, kindling, and fuel wood matters enormously in the rain, and using the right fire structure protects your fragile young flame while giving it the airflow it needs to grow. A thoughtful build is the difference between a flame that sputters out and one that takes hold.
Start small and deliberate: place your dry tinder on your dry platform, surround it loosely with feathersticks and the finest dry kindling, then build up gradually with progressively larger split, dry wood. Structures like a teepee arrangement concentrate heat and let flames climb to dry the fuel, while a lean-to can shield the tinder from rain on the windward side. The key is leaving enough space for airflow while keeping the burning materials close enough to feed each other.
Crucially, have all your materials prepared and staged before you ignite, because once your flame is alive in the rain, you won’t have time to gather more — you need dry fuel ready to add immediately as the fire grows. Feed it patiently, adding larger pieces only as the flames strengthen. A strategic, well-prepared structure gives your rain fire the protection and progression it needs to become self-sustaining.
The most vulnerable moment for any rain fire is when the flame is young and small, so actively protecting and nurturing it through this fragile stage is essential to success. A new flame in the rain needs your shelter and attention until it’s strong enough to defy the elements on its own.
Shield the young flame from rain and wind with your body, a tarp, or your protected location, blocking the drops that could extinguish it while it builds strength. Gently feed it your prepared dry kindling, adding small pieces steadily so you don’t smother it, and breathe carefully at its base to supply oxygen and help it grow hotter. As the fire builds heat, it gains the power to dry and burn even slightly damp wood, becoming increasingly resilient.
Patience is everything at this stage — rushing by piling on too much wood too soon is the most common way to kill a promising fire. Once your fire is burning strongly and producing good heat, it develops the ability to overcome moisture and even shrug off light rain. Nurturing it carefully through its vulnerable infancy is what carries it to that triumphant, self-sustaining blaze.
Getting a fire lit is a major victory, but in persistent rain, keeping it burning requires ongoing attention and a few smart techniques to prevent the rain from gradually winning. A strong fire resists rain far better than a young one, but sustained downpours still demand management.
Maintain your overhead protection — the tarp, canopy, or shelter — to keep heavy rain off the fire, and keep a reserve of dry fuel sheltered nearby so you can feed the flames without introducing too much wet wood at once. As the fire grows hot, you can begin drying wet wood by placing it near the flames to dry before adding it, effectively using the fire’s own heat to prepare its next fuel. A robust bed of coals holds heat and helps burn through dampness.
Building the fire up to a good size with a solid coal bed gives it the thermal mass to withstand rain that would extinguish a smaller fire. Keep tending it, protect it from the worst of the weather, and continually prepare dry fuel, and your fire will keep blazing through even prolonged rain. With these techniques, you don’t just start a fire in the rain — you keep it roaring for as long as you need its warmth.
While skills are paramount, carrying the right gear makes starting a fire in the rain vastly easier, so let’s cover the essentials that turn a soggy struggle into a manageable task. The right tools, combined with the techniques above, prepare you for the worst conditions.
The cornerstones are a quality fixed-blade knife for splitting wood and making feathersticks, a ferro rod as your weatherproof primary ignition source, and reliable waterproof tinder like waxed cubes or petroleum cotton balls that catch instantly regardless of rain. Add stormproof matches and a windproof lighter as redundant backups, and a compact tarp or emergency blanket to create overhead shelter, and you have a complete wet-weather fire kit.
Storing these items in a waterproof container ensures they’re ready and dry when you need them, and keeping a compact version on your person means you’re never without fire capability. Gear alone won’t start a fire, but the right tools dramatically improve your odds and reduce the effort required. Combine quality gear with the skills from this guide, and rain becomes an obstacle you can confidently overcome.
Starting a fire in the rain transforms from an impossible-seeming ordeal into an achievable skill once you understand the principles and practice the techniques. The secret isn’t any single trick — it’s the systematic approach of finding protection, building a dry platform, sourcing dry tinder, splitting wood to its dry core, and using weatherproof tools to ignite a carefully built, well-tended fire.
Remember that preparation makes everything easier: carry a ferro rod, a quality knife, waterproof tinder, and a means of overhead shelter, and you’ll be ready for wet conditions before they arrive. But gear is only half the equation — the skills of finding dry materials, batoning wood, making feathersticks, and nurturing a fragile flame are what truly let you conquer the rain. These skills weigh nothing and never run out.
Most importantly, practice these techniques before you need them, ideally on a damp day in a safe setting, so the knowledge is in your hands when a real emergency strikes. The ability to make fire in the worst conditions is among the most valuable and confidence-inspiring survival skills you can develop. Master it, and no amount of rain will ever leave you cold and helpless again.
Stay warm, stay prepared, and never let the rain win. 🔥
Found this guide helpful? Share it with your fellow adventurers and explore our other guides on fire starters, ferro rods, and emergency kits — your complete resource for mastering fire in any conditions.


No Comments